

In this post I will walk you through the creation of first android project - "Hello Android" in Eclipse.
Step 1- Installing & Configuring Eclipse for Android Development : Of-course first step is to download the "Eclipse standard Edition" and install "Android SDK". Here is a good tutorial achieve this.
Step 2 - Configure the virtual device: I have created a post on "how to configure virtual device on for Eclipse, (here are the links to my posts on configuring Phone for eclipse, Emulator for Eclipse and Genymotion for Eclipse).
Step 3: Once Eclipse is installed and configured with Android SDK, create a new Project by navigating to, "File" then click on "New" and then click on "Other"

Step 3: From "New - Other" Screen (Screen 1 from the below screenshot) you should be seeing a folder like icon "Android" expand it and select "Android Application Project" and click Next. In the next screen (Screen 2 from the below screenshot) give your application a name without any spaces, give a package name and select the minimum and target sdk versions and the compiler versions. For the theme, leave it default. Navigate through the next few screens leaving everything default. On the finish screen make note of your "Activity Name" which is "MainActivity" in my case. This is the name of one of the key files for an Android application. I will be using the term "MainActivity" very often throughout this tutorial, so if the "Activity Name" on your screen (Screen 6 from the below screenshot) is either different from mine or if you have changed this to something else, please make a note of it to avoid confusion.

Step 3 - Change the perspective to "Java" (Optional): This is not something you have to do it, but it is advised to do so in order to avoid the confusion between my screen and yours. To change the perspective. Click on "Window" from the top toolbar and select "Open Perspective" and then click on "Other". From the pop up (Screen 2 from below Screenshot), select "Java (default)" and click "OK".

Step 4: After completing the above step for my eclipse was blank. If you don't see anything, click on small overlapped boxes on the left most corner of the Eclipse IDE.

Step 5: Once everything is done the project structure should look something like as shown in the below screenshot.

Step 6: Now that we have a basic Android Project, let's try to run this. Right click on the project from the left pane and click on "Run As" and then click on "Android Application".

Step 7: Now you will be prompted with list of virtual devices to select from. If you have successfully configured your Eclipse as mentioned in the Step 2 of this post, you can now select your device and click "Run". I prefer Genymotion emulator, so for this tutorial I will run my app on a virtual device created by Genymotion. You may choose a different virtual device from AVD.

Step 8: Clicking on "OK" will start building the project and then the app will be deployed to your phone/emulator. And the basic app looks like this.

Step 9: You are right!! there is nothing that we did manually so far. These are the basic initial steps to make sure if everything is in place. Lets do a small change to the Hello World. Lets make it Hello Android. All the strings that we use in the application must be placed in a file named "strings.xml"
This file is located under "values" folder in "res" folder :

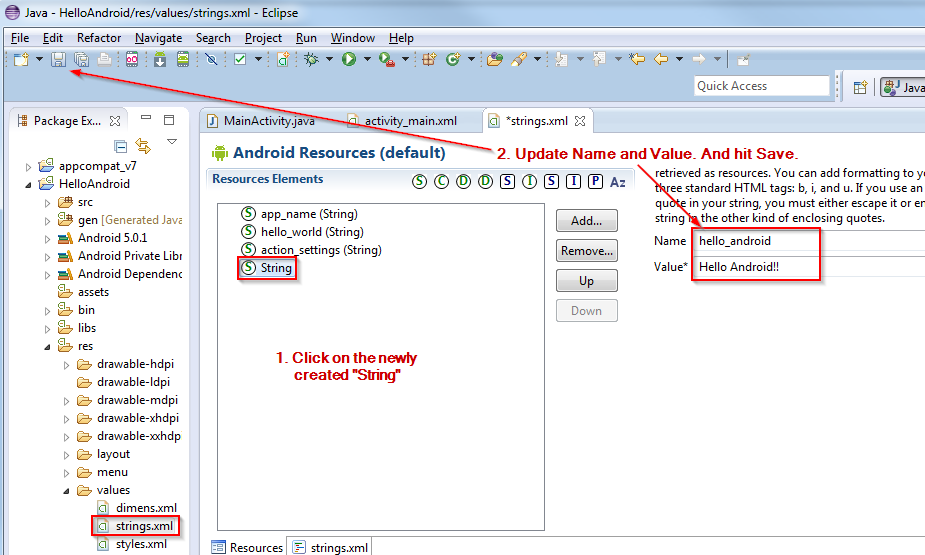
Step 10: Double clicking on the "strings.xml" will open the strings.xml file. which looks like:


Now click on the "String" from the "Resource Elements" page and add Name and Value.
Step 12: Let's replace the "Hello World!" from step 8 to "Hello Android!!". To do this, we have to open our application activity, which is located in "layout" folder, which is located under "res" folder.
The default activity file should look something like this:
If you observe from the above code, I have commented the existing "TextView" and added a new one. The line "android:text="@string/hello_android" does the trick. In Android development, to reference a string that is in the "strings.xml" file, we use the following structure:


Post a Comment